Undoubtedly the most popular matcha-based drink, the matcha latte marries the deep, rich flavour of matcha with the mellow sweetness and creaminess of milk or non-dairy alternatives. Here, we’ll take a look at how to choose the best matcha and milk for use in lattes and teach you how to make our favourite version of this ubiquitous drink. Skip to the end for the final recipe.

Choosing Your Matcha
While it is generally true that better ingredients yield a better result, we’d suggest saving your single cultivar, aged kuradashi matcha for another time. The subtler, complex tastes of a top grade tea will get lost in a milk drink.
However, you shouldn’t cheap out and use a bulk bag of intensely bitter, bland, and grassy tea. While milk—and to an extent non-dairy milks—can help reduce bitterness, it can only do so much.

The ideal matcha for lattes should have a strong, bold taste that can cut through milk, and also have little to no bitterness when enjoyed straight. Our preferred matchas for lattes are Komiya and our organic Haruto. Both of these have bold taste that can cut through milk, letting the matcha shine as the star of the drink.
Choosing Your Milk
Whether dairy or plant-based, there are an overwhelming variety of milks to choose from, and in a drink that is predominantly milk, it is important to choose the right one for you. The three main areas of concern are taste, texture, and steamability/foamability.
For dairy milk, the go-to choice for lattes has always been whole milk, with the higher fat content producing a creamy, luscious mouthfeel and also resulting in a denser richer foam, compared to light and airy foam of skim milk.
Every plant-based milk behaves a little differently when steamed, so be sure to pick one that can hold a stable microfoam and doesn’t curdle too easily. Barista-grade oat milks and almond milks which are specifically made with steaming in mind have become extremely popular for this reason. Coconut milk is another popular choice for matcha drinks because of its natural sweetness, compatible taste, and higher fat content which gives it that creamy texture. A personal favourite of mine is traditional soy milk (untreated, unflavoured, and unsweetened), though you can use other soy milks if you’re not a fan of the soybean flavour.
If one of the reasons you are drinking matcha is for its purported health benefits, it is worth noting that the casein in dairy milks binds to the catechins (antioxidants) in matcha, rendering them less effective.
Making the Drink
Our recipe produces an 8oz (240ml) drink, which we found to be the perfect size for a latte: plenty of sweet, creamy milk, yet not too much to overpower the tea. For a stronger drink, check out our matchaccino recipe.
Part 1: The Matcha

Like all of our matcha milk drink recipes, we start out with our concentrated matcha base using 4g of matcha gently mixed into 40ml (~1.5oz) of 80°C water. This 4g/40ml ratio is easy to remember and yields a powerful matcha flavour in the same volume as a traditional double espresso, meaning you can substitute this matcha base into your favourite espresso drink recipes.
As always, be sure to sift the matcha into a dry, preheated bowl. A dry vessel and sifted tea help to ensure that there are no clumps in the finished drink. A warm bowl also keeps the tea from cooling too much by the time you assemble the finished drink. While preheating can seem like a chore, it makes sure your drink is at the right temperature and gives you an opportunity to pre-wet your bamboo whisk, softening it and prolonging its lifespan.

If you want to pour latte art, we recommend making your matcha base as foam-free as possible, while still evenly mixing in all of the tea. While foamy matcha is great for usucha, the fluffy matcha foam is much lighter and airy-er than the dense microfoam of well-textured latte milk, which makes it hard to pour any fancy designs.

While you could potentially make this base in the same cup or mug you’ll be drinking out of, evenly whisking in such a small space can be difficult, so we prefer to make the matcha base in a spouted bowl, and pour it into the cup. This also makes it easier to whisk a larger batch for serving multiple people.
For a more detailed look at how to make this base, check out our guide.
Part 2: The Milk
For this 8oz latte, measure out 180ml (6oz) of your milk of choice (the remaining .5oz of this drink will come from the milk foam). Now it’s time to heat and texture (foam) it. The ideal texture is microfoam: a dense, wet foam with bubbles too small to see and a silky, velvety mouthfeel. We want to avoid over-frothing and producing an airy, dry, crisp foam which separates from the liquid milk. While getting the perfect milk texture might seem intimidating and complicated at first, with a little practice it becomes much easier.
Steaming Milk
Traditionally, milk texturing is done using the steam wand of an espresso machine or a stovetop milk steamer. Steaming milk this way simultaneously aerates it, mixes it, and heats it.
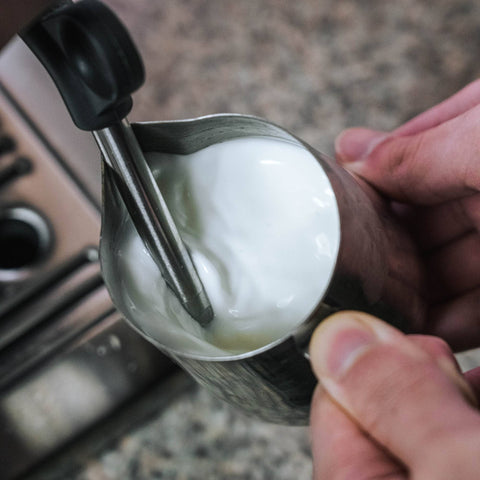
Ideally, you'd froth in a steel milk pitcher (pictured above). For beginners, we recommend using one with a built-in thermometer or temperature sticker (like this one) which will ensure you don't overheat the milk.
With the steam wand placed halfway between the centre and the side of the pitcher, and the tip placed just below the surface of the milk, turn on the steam and let the milk gently aerate or ‘stretch’ it (you’ll hear a slight ‘ripping’ or ‘kissing’ sound). If it’s aerating too fast, raise the pitcher; if it's not aerating at all, lower the pitcher. You should have one hand holding the handle of the pitcher and another feeling the bottom of it. As soon as the pitcher feels warm to the touch, raise it slightly to bury the steam wand in the milk and stop aeration. At this point, you should be generating a small vortex with the steam which will smash the big bubbles down into microfoam and mix the foam with the milk. When the pitcher is too hot to touch for more than a second, turn off the steam and you’re done! Make sure to purge and wipe down the steam wand immediately afterwards. Nailing the technique takes some training and practice but ultimately yields the best results: silky, dense, velvety microfoam.
Frothing Milk without an Espresso Machine
If you don’t have an espresso machine, there are many other methods you can use to heat and froth your milk. Heating can be done in a microwave or over the stove. In either case, make sure the milk does not exceed 65°C (~150°F). Any hotter than this, and the milk will lose its natural sweetness and begin to cook.
To froth the milk, you can use a clean french press, handheld frothing wand, or a dedicated automatic electric milk frother (which often can heat the milk too). If you’re doing it manually, you’ll want to spend around 10% of your time aerating the milk and 90% of it mixing the froth with the liquid milk.
Using a French Press

Perhaps the best and cheapest substitute for steamed milk is milk frothed in a French press. With the right technique, the foam quality can be great and French presses are relatively cheap; you might even have one stashed in a cupboard.
First, aerate the hot milk by raising the plunger to the top of the press and swiftly pressing it all the way down. Repeat this another 2-3 times to generate a lot of froth. Now, lower the plunger so it's submerged in the milk and pulse it up and down, keeping it submerged. This breaks down larger bubbles and mixes the foam with the milk. Keep pulsing and swirling the french press until you have a dense and even foam.
If you don't have a French press and don't plan on using one for coffee, you can use a dedicated manual milk frother, like this one. These are practically the same as a French press but smaller, and with smoother action for easier frothing.
Using a Handheld Frothing Wand

We can apply the same logic when using a handheld frothing wand. When the frother spins it generates a vortex. Aerate the milk first by putting the wand at the centre of this vortex where it can grab air and mix it into the milk. Then put the wand towards one side of the pitcher and tilt the pitcher in this direction, ensuring that the wand remains submerged and does not grab any more air. Keep mixing until all the large bubbles are popped and you have even microfoam. Swirling the pitcher and tapping it firmly on a counter can help finish off any stubborn bubbles.
Any cheap frother will be more or less the same, but if you want an upgrade, the NanoFoamer by Subminimal uses a mesh rather than a coil to produce a texture closer to steamed milk.
Using an Automatic Milk Frother
If you have an automatic milk frother, many of these tend to over-froth and produce very dry foam which sits on top of runny milk. To fix this, scoop off some of the very top layer of dry foam, and swirl the remaining foam into the milk, which will help homogenise it.
Part 3: Combine and Enjoy

When you have your heated and textured milk, pour it into the matcha base and enjoy.
If your milk is perfectly textured and you’re feeling daring, you can even pour some latte art.
For a stronger drink, try our matchaccino recipe.
Recipe Recap
- Sift 4g of matcha into a dry, preheated vessel.
- Add 40ml (~1.5oz) of 80°C (176°F) water.
- Whisk slowly in a circular motion.
- Pour the matcha base into a preheated 240ml (8oz) latte cup
- Steam/heat/foam 180ml (~6oz) of milk or milk alternative to 65°C (~150°F)
- Pour the milk into the matcha base (with latte art, if desired) and enjoy!

